Showing posts sorted by date for query chalk cloth. Sort by relevance Show all posts

Tuesday, December 9, 2014

DIY Kit: Hanging Chalkcloth Banner!

Perfect for the holiday chalk art, dinner party menus, or an everyday to do list! Use this kit to make your very own Hanging Chalkcloth Banner. Click here to see the tutorial! 

Kit Includes:
- 18" x 47" of chalk cloth
- 24" dowel rod
- 1 yard of mini pom-pom trim
- 1 yard of ribbon
- 1 yard of bias trim
- 3 yards of 3 different rick racks
- 1 piece of chalk
- 1 permanent chalk marker
- Instruction sheet

Kit Price: $20.00

Choose from 3 colors, green, aqua and red!

Thursday, November 20, 2014

Chalk Cloth Banner!


A week ago I bought a few magazines that I haven't subscribed to in years. I stopped getting the magazines long ago cuz they made me feel bad. I hardly had time to read them let alone put the content to good use. But, all that has changed!! Now that I only have my little specialty fabric shop to work on I have time to be crafty again.
Photo Credit: Martha Stewart Living Banner-Style Menu
So I took my magazines, a cup of hot chocolate, and got to reading. I started with Martha Stewart Living's November Issue and BAM!! I was struck with an inspiration. The butcher paper banner menu needed to be made out of chalk cloth!! Right?

The next day I got stitching. I decided to use my Simple Bunting tutorial -- which is really easy version of my Country Living Oilcloth Fair Flags --as a jumping off point. 

Photo Credit: Be Crafty and Recipe for Crazy
As I got about half way through with my banner I realized how silly I am. The inspiration for this project really comes from the super cute Leslie Zellers. She and Amanda (also very cute!) had just done this project at the Be Crafty Workshop in Nebraska the week before. DUH!!
Photo Credit: Be Crafty and Recipe for Crazy
Leslie's version is much simpler and requires no sewing. I suggest doing what you have time for.

For my version you need the following stuff:
  • 1/2 yard of Chalkcloth (TM)
  • 24" dowel round that is 1/4" in Diameter
  • Thread
  • Wide ruler, cutting mat and cutter
  • Chalk or chalk pen
  • Assorted string, ribbons, lace and pom pom trim to bling it out.
1. Fold your Chalkcloth (TM) in half lengthwise and lay it out on your table so the folded side is nearest you. Then use pattern weights to keep the chalk cloth from curling up on you.

2. Hand press a crease a fold into the Chalkcloth (TM) by running your hands up and down the fold a few times. You can use a few clothes pens to keep it secure if need be.

June Suggests: Straight pins can leave holes in chalk cloth so I suggest using these pinning methods instead.
3. True up the right hand corners and the edge of your Chalkcloth (TM) using a large/wide ruler, cutting mat and rotary cutter. I like to use the grid markings on my mat to create a true line to start from. Line up your fold along the 1” line on your mat. Then place the ruler perpendicular to the 1” line. Make sure that your folded fabric doesn’t shift. Holding the ruler firmly in place cut a straight line cutting off about a quarter of an inch, or whatever it takes to get it even and true. Use a few binder clips to "pin" your side securely.

4. Now, flip your fabric upside down and repeat the last step on the other side of the fold. Cutting off just enough to true up the edge making the corners square and the edges even.
5. Find the center of your trued up chalk cloth and measure up 5", then use a pencil to make a small dot at this point. Fold up the Chalkcloth (TM) in half width wise, making sure not to hand press or make a deep crease. You will not want a fold line down the center of your banner. Place it on the cutting mat and with your ruler and cutter create an angled cut. Lay your ruler so it's going from the bottom banner (at the side) to the pencil dot in the center. This will create your notched banner.
6. At your sewing machine, sew a 1" casing along the top folded edge of your banner. This is where you will slid in your dowel rod. Then sew the sides and the bottom of your banner using a 1/4" seam allowance, making sure not to close up your casing at the top.

7. Now comes the fun part! I added a bit of glue and gold glitter to my dowel rod. You might notice that my dowel is not really a dowel rod but really a bamboo garden stake. I'm a big fan of using what I have, so when I didn't have a dowel long enough I grabbed the stake our of our shed instead. Sometimes you just have to make do, just to get things done. Now add a string and whatever bits of ribbon and trim you have in your scrap box to make is pretty! I used some of the pom pom trim that we sell in the shop. 

8. Chalk Art! For this project snagged a free Santa image of the old internet and dropped it into Illustrator and typed in my favorite Christmas saying. Not into Santa? That's cool, you could totally use some fun Hanukkah clip art instead. After I got the image looking just right I printed it out, it filled up an entire 8 1/2" x 11" page but it still wasn't big enough, so I enlarged it 200%. I took Emily Jeffords advise that she shared on the Indie Craft Parade blog. Basically, I ran a bunch of regular chalk on the back of the paper and transferred it on to the Chalkcloth banner. Then I used a chalk pen marker to enhance the image.

For my Thanksgiving banner I used chalk and drew out my bird free-hand. Then I used a chalk marker to fill out my sketch.

Chalk markers can be found at your local art and craft shop. Check back soon I hope to have more in stock soon.

See my blog post To cure, or not to cure, that is the question so you can see how to care for your Chalkcloth (TM)!

I hope you all have a fantastic holiday season!

Tuesday, November 18, 2014

To cure, or not to cure, that is the question!


To cure, or not to cure, that is the question. For years I've been telling you all to cure their Chalkcloth (TM), but I don't always do it myself. Why, you ask?  Well, for one, I like the solid black nature of the unused Chalkcloth (TM). Especially when I use a chalk pen marker (found at your local craft shops and in the party section of Target). When I use a chalk pen I'm not going to erase it too often. I only use a chalk pen when I'm doing a menu on one of my chalk cloth runners or placemats. Or, for my super cute project tutorial I have planned for tomorrow.
My favorite chalk marker!
Some chalk pens can leave a ghost line behind, so I normally cure the Chalkcloth (TM) after I use a pen for a project. So, I'll use it black the first time, use a damp cloth to get the pen off and then I'll cure the chalk cloth. After that I'll use regular chalk or the pen again. Test your pen on a hidden bit of chalk cloth to test is first. Let it dry and see if it clean off nicely before use.
The curing process!
To cure your new Chalkcloth (TM) simply lay a piece of chalk on its side on the chalk cloth surface and rub all over, side to side, then wipe clean. I like to us a barely damp cloth to do the clean up. Now, do this one more time, rubbing your chalk up and down this time. Wipe it clean one last time and the Chalkcloth (TM) is now ready for use. 
Chalk can get sharp so rotate your chalk as you work.
Now, you need to know that the chalk will become sharp as you rub it up and down the cloth. These sharp edges will scratch the surface of your material or project. This is normal and there just isn't any way around it. You are turning fabric into a chalk board, which is by nature, a dusty and scratchy surface that is slate gray.
Before and after!

OK, what if you choose not to never cure your Chalkcloth (TM)? Well, in that case you'll see  cover ghost lines that are left behind by the chalk pens and regular chalk. Meaning, you'll be able to see what you wrote the last time and the time before that. Eventually, it will be come scratched up when you use chalk cloth and it will become grey as you wipe it clean. Every time I've tried to keep a chalk cloth item black, I've ended up caving in and curing the surface. It just looks better in the end, all slate grey and dusty!
To care for your Chalkcloth (TM) just use a damp cloth or sponge to wipe down your projects when you're done. Chalk will build up on your towel so rinse and repeat until your happy with the result. The more chalk dust you get off the blacker your Chalkcloth (TM) will be.
Ghost lines and smearing are normal if you don't give your chalk cloth a good cleaning every once and a while. For example this is my homeschool chalkboard that I made back in 2009! As you can see this has gotten a lot of use with U. S. History lately. When all else fails and you have too many ghost lines like I do, just do the curing process all over again! 

So grab some Chalkcloth (TM), some chalk and have a blast! Click here for a ton of tutorials and tips for Chalkcloth (TM).

Monday, June 30, 2014

Flash Back Photo Album: 2013 Country Living Ohio

I'm going to be catching up on the blog this wee. Everyday I'm going to post a photo album that I should have posted ages ago! A lot has happened in the last 12 months that I haven't blogged about properly.

First up! Country Living Fair in Columbus Ohio 2013. This was by far the best set up to date, I hope you enjoy it! I'll be at this show again in September and I hope to see you there too. The dates are Sept. 12, 13, 14, 2014. Click on over to buy up your tickets. I suggest you get the Early Bird tickets, this way you get great deals and first pick of all the goodies! Best of all, no crowds!

You know I'm doing this one first because we are starting to prep for it, right? This show is our best show of the year. It' takes a lot of sewing to get there. : )

This is my lovely spot under the will tree!

This is our cutting table, yes, we cut fabric to order at the show! Cool, right?

Oilcloth Chickens of LOVE!
Buy and sell mixed in with handmade housewares!
Vintage housewares and art work by Trish Preston!
Party Banner, chalk cloth and bags galore!
Kids, babies and bags!
Pillows, aprons and more.
Aprons, aprons and more aprons!
A ton of fabric and our lined Yia Yia Carts!

See you at the fair, 
Kelly


Friday, June 27, 2014

I spy oilcloth and laminated cotton at Finding Home!

A while back I invited the Lynn, from Finding Home to be a part of my At Home with Modern June blog tour. I asked her to show her readers how to use the covered seat cushion project that is in the book. I also sent her a box full of black and white oilcloth and laminated cotton to play with.
Lynn, used our great Black Picnic Check oilcloth to recover her kitchen chairs. This fabric has been a big hit. We started carrying it thanks to fellow blogger, The Painted Home, when she had picked it out for her Crafty Camper seat cushions.
The chairs are lovely, aren't they?
Next, she made simple oilcloth placemats by cutting a single layer of oilcloth into squares. She topped it all off with a laminated cotton runner, again, just a simple cut piece of fabric. Both of these fabrics are great, they don't fray so you don't have do any fussy sewing -- if you care not.
Then she got fancy! Lynn created a no-sew silverware sleeve with black polka dot oilcloth and washi tape. Next she topped it off with a chalk cloth tag, that she made with a punch that she just happened to have. A very crafty gal!
See her blog, Fining Home, to see how she made the template.

I hope you enjoyed this peek into Lynn's lovely home! See her blog Finding Home for so much more!

xoxox,
Kelly


Tuesday, April 15, 2014

Tour: The Crafty Camper!

Love the fun patterns on this oilcloth! 
Yesterday I showed you have to make the Scrappy and Simple Buntings that I made for a very cool camper. Well!! Today, we are going to tour that Crafty Camper! Please note that the photos below where shamelessly swiped from Kelly Elko's wondrous blog, Eclectically Vintage. All photo credit's go out to Kelly, the other Kelly! Here's her tour post!


These photos were take at the Philadelphia Home Show, where Denise from The Painted Home, debuted her Crafty Camper. As you can see below I had a fun decking out the 1972 Shasta with Modern June goodies!
  The Crafty Camper - take the tour of this mobile DIY workshop!
 Aren't my oilcloth and chalk cloth banners fabulous swinging off this camper?

Cute oilcloth pillows - love the vintage camper!

I made a few specialty pillows out of oilcloth for the camper too. More about them soon! Our regular  oilcloth pillows are available on our new website, ModernJune.com!

Oilcloth pillows and buntings - such a fun retro look!

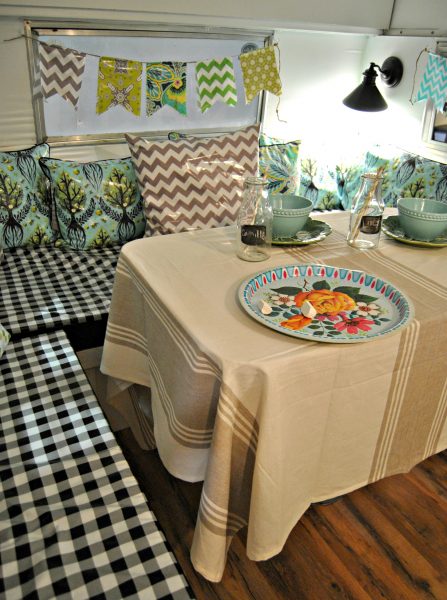
I also made the camper some oilcloth seat cushions using my pattern in Sewing with Oilcloth! The laminated cotton throw pillows are made using the pillow cover pattern in my latest book At Home with Modern June. My pillow cover pattern uses an invisible zipper--it's so easy that even I can do it! Those that have worked for me know that I don't DO zippers! (ie, I did them poorly until now!!)

Peek inside a 1972 Shasta vintage camper completely renovated

Check out the Scrappy and Simple Bunting hanging on the window, what a fun way to create some interest, both inside and out. I can almost see them swaying in the breeze now!  

Galvanized bucket sink
There is so much more to be seen! Again, check out Kelly's entire tour here! Then head over to the Crafty Camper website to see when camper is in your area doing DIY classes! Eek!! You can rent this as well!! Also, for the part I like best!! If you go way back to Denise's December and January photos on Facebook you can see some great before and during photos of the Shasta!

XOXOX,
Kelly

Friday, April 11, 2014

Best kind of trade, chalk cloth for joy!

Months and months ago, I said yes to a giveaway. Little did I know that I was in for a real treat! Heather, from Life Made Lovely asked if I'd donate some chalk cloth for a Be Crafty retreat. OM! I couldn't refuse, in fact I wanted to attend the crafty workshop!

I had almost forgotten all about it when I saw a ton of super cute photos turn up on Instagram! The photos were of the chalk cloth hoops that Amanda (Be Crafty) and Lesley from Recipe for Crazy made with the cutest bunch of crafty gals in the southwest! See the group shot here!

I've snagged some of the photos for you all to see...

 How cute are they? 
 First up, wrapping of the hoops.
Slide the chalk cloth into the hoop! 
 Get chalky!
Let's go out there an be crafty too!

XOXOX,
Kelly 

Tuesday, April 8, 2014

One very exciting Monday morning!


Well yesterday was a doozy! It was day one for my blog tour and I was on TV! It was a great way to kick off the launch of my new book, At Home with Modern June! 

The day started with a demo on Virginia This Morning on WTRV CBS 6. Jessica Noll and I chatted about the book and how to make a no-sew placemat out of chalk cloth.

Then, it was blog tour time! Stash Books Blog kicked off our blog tour with a post and a give away! I am so amazingly proud of this book. It's filled with sewing projects for every room in the house using every type of fabric out there.

Follow along with me on Instagram, Twitter, Pinterest and Facebook for more blog tour updates.