Thursday, April 10, 2014
Non-Traditional Ways to Iron Oilcloth
Book Pressing is very easy, but it can cost you time. It's best for projects that need a really crisp edge or for really thick seams. Simply lay a stack of books on top of your seam(s) for a few hours or overnight. Gravity and the weight of the books flatten out your oilcloth so you can stitch with ease.
This next one is just a good old finger press. All you do is rub your finger, thumb or the palm across the seam that you need to be flatten and tamed. Tip: I always press both my seams off to one side when working with oilcloth, it's just gives you a nicer finish. Trust me trying to keep open seams flat on oilcloth is a losing battle.
The last method I have for you is the crease press. I do this when I work with the 1" oilcloth trim that I used on the floor mat in At Home with Modern June. All you have to do is fold your trim in half and rub the oilcloth trim along the edge of your table. This just creates enough of a crease down the center so you can sew fast and free!
I hope this helps you in your addiction to oilcloth!
XOXOX,
Kelly
Tuesday, November 11, 2008
OCA tutorial #2 "Keep on Rollin"
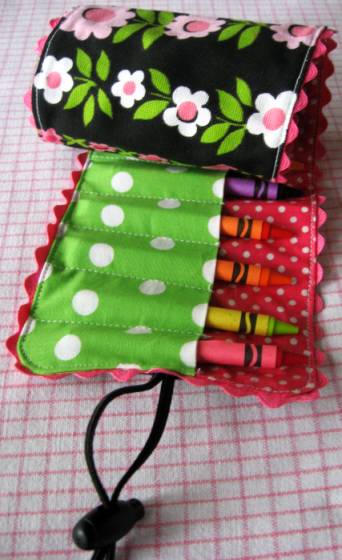
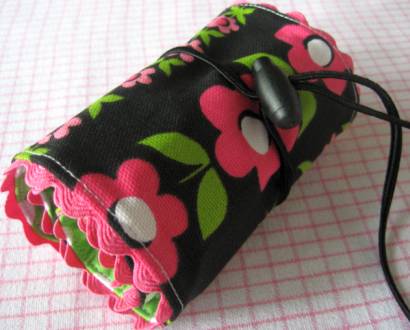
It's Tuesday so that means that it is tutorial time here at OILCLOTH ADDICT! Todays guest tutorial comes from Skip to my Lou! My friend and assistant Suzanne (of Silver Tree Art fame!) introduced me to this next blogger! This blog is choke full of free patterns, downloads and loads of inspiration! I could get lost there for days! Cindy is letting us share her Crayon Roll Holder, and we can't thank her enough!
Suzanne brought this idea to me because she believes this would be a great project to do with Oilcloth, I could not agree more! Oilcloth is great for all kinds of kids products. It whips clean with a damp sponge and comes in tons of great colors and patterns. I for one am seeing some lovely hand made gifts for my nieces and nephews! I know the parents will love them too!
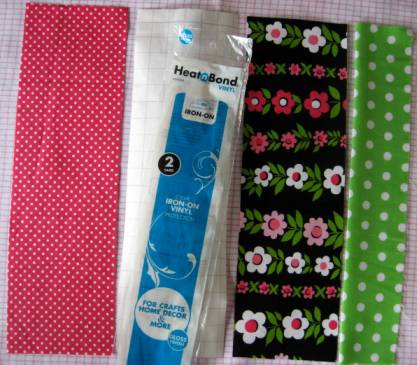
There is two ways you can change the tutorial below you could simply replace the larger inner piece that Cindy has used the iron on vynal or you could use oilcloth for the entire projects.Here is our modified supply list for the Crayon Roll:
One to three OCA Fat Quarters
1 - 5 X 16 1/2 inch piece of fabric for the outside (oilcloth optional)
1 - 5 X 16 1/2 inch piece of fabric the the inside (OILCLOTH)
1 - 6 X 16 1/2 inch piece of fabric folded lenghtwise and pressed for the pocket(oilcloth optional)
ric rac (never optional in my world!)
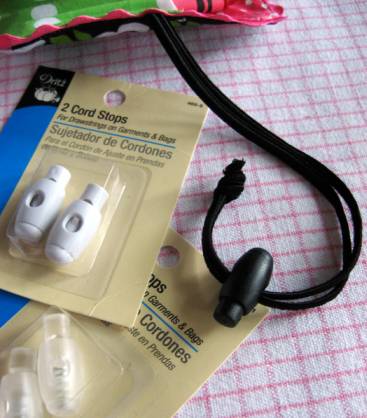
cord and cord stop
Now on with the tutorial...NOTES FOR OILCLOTH ARE IN RED!
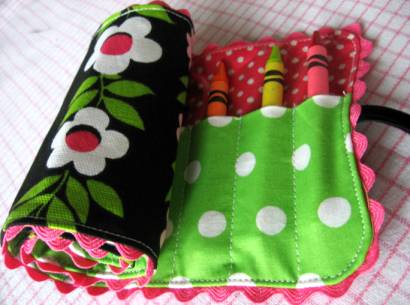
This Crayon Roll Holder is a great and useful gift for children!
I noticed on our crayon roll that the inner fabric lining gets marked up quite a bit from the crayons going in and out. So this time instead of using interfacing on the lining piece I covered it with iron on vinyl. This is such a cool product. I had to keep myself from covering all the pieces—and I am glad I didn’t. The turning at the end gets it a bit wrinkled. I fear if I had done the whole thing it might look like a mess. The only draw back is that it is slicker and the crayons have less friction. However the new closure allows you to tighten it up to keep the crayons inside.
You need:
1 - 5 X 16 1/2 inch piece of fabric for the outside
1 - 5 X 16 1/2 inch piece of fabric the the inside
1 - 6 X 16 1/2 inch piece of fabric folded lenghtwise and pressed for the pocket
ric rac (if desired)
1 - 5 X 16 1/2 piece of iron on vinyl
1 Cord Stop
Iron on the vinyl to the right side of your lining piece following package directions.
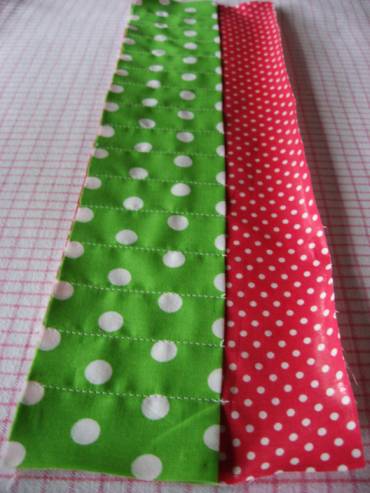
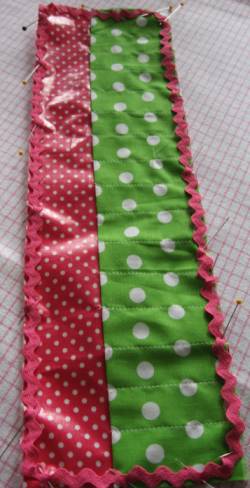
Place pocket piece ontop of right side of lining. Starting 1 1/4 inches over from the edge, stitch from top of pocket (back stitch at top) to bottom. Then stitch every 1 inch. You should have 1 1/4 inches left on the other end. USE LONG STITCH LENGTH when stitching directly on top of oilcloth.
If using ric rac pin it around the edges, overlap at bottom. I use fray check to keep ends from unraveling.
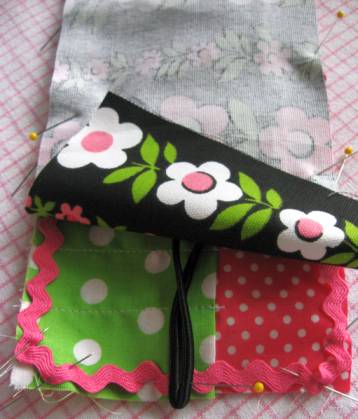
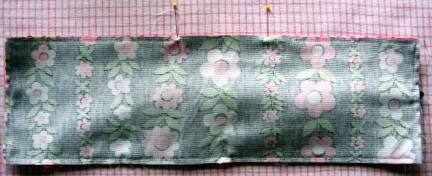
Place outside piece ontop of pocket and lining, right sides together. Place a 20″ piece of cord (folded in half) in the middle on the right side. Ends of cord go towards the center.
Sew all the way around 1/4 inch from the edge. Leave a 2-3 inch opening at the TOP. OILCLOTH CAN BE TOUGH TO TURN SO LEAVE 4-5 INCHES FOR THE OPENING.
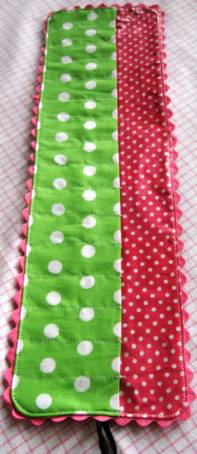
Clip corners and turn. Press (If you do use oilcloth DO NOT press OILCLOTH with bare hot iron), making sure to press opening to the inside. FINGER PRESS OILCLOTH EDGES SMOOTH. Pin opening shut and then top stitch all the way around very close to the edge (making sure you sew all layers of the opening shut.)
Squeeze the Cord Stop and thread both ends of the cording through the center hole (have patience, thread ends one at a time). Tie the ends of the cording together into a knot. I placed a drop of glue in the knot to keep it secure and then put fray check on the ends.
Finished! OCA recommends you place your finished product laying open on a flat surface and stack a few heavy books on top of it to get the seams nice and flat.
This tutorial was originally published at Skip to my Lou on September 9, 2008. Oilcloth Addict has posted it with their express permission. As always OCA is dedicated to offering you great tips and projects. If you have an idea that would fit with in out blog please let us know. We would love to share your ideas too!
Go get crafty!
Saturday, June 6, 2009
The Oilcloth Alfresco Series, Picnic Mat
After reading the new book by EllynAnne Geisel, The Kitchen Linens Book: Using, Sharing, and Cherishing the Fabrics of Our Daily Lives, I just had to make this pretty picnic mat for my family. The day my family spent flying kites in a wet field I knew we needed one of these, but it was the section on picnics that made the idea a reality. My philosophy for both shops Modern June and Oilcloth Addict is that small things in life help to make big memories. I know EllynAnne feels the same way. Linens of all types evoke fond memories.
Check out my review of the book at Sew Mama Sew! Don't forget to leave a comment after reading the post, Sew Mama Sew is giving away 6 books!!!
Be aware my mat is a big one, 8' x 8', just great for a family of four. Feel free to scale up or down for your needs.
Stuff you gotta have:
4 yards of oilcloth, seen in Lime Green Gingham
A fat quarter of a fun fruity oilcloth pattern, appliques are from the Apples and Pears Oilcloth
Rotary cutter
Ruler or yard stick
Gypsy Gripper, an optional tool I can not live with out.
Thread

step 1. Cut cut out your appliques and take your four yards of oilcloth and cut it into two equal parts ( two, two yard pieces)
step 2. Pin your appliques in the correct corners. You are doing this first so don't have to wrangle that big mat under the machine like it did! Trust me do it now while it is in pieces!
step 3. Sew your appliques into place.
Tip! When turning sharp corners leave your needle in the down, lift pressure foot and then turn.
step 4. Sew your two sides together making a large 8 foot square. Sew right sides together using a 1/2 SA. I suggest you place your machine on the largest table you have, this is a lot of oilcloth, a large table will help support the bulk and keep you happy.
step 5. Lay oilcloth face up roll both sides of the up so you can easily get to your seam. Nowfinger press your seam off to the left. There is no need to pin.
step 6. Back at the machine you are going to want to do an edge stitch off to the left. This is going to strengthen your seam and substitute not being able to iron. This will help that seam behave. As you stitch make sure both sides of the seam are off to the left.
Tip! I like to use the inside edge of the presser foot as a guide to keep my top stitch straight.
step 7. Fold you hem up one inch and sew one side, then do a faux mitered corner. Or better yet check out this tut for the real thing. I wish I had looked that up when I was sewing up the hem.
Note! Oilcloth does not fray so you could leave this edge raw or pink the edges. I hemmed the mat to help give it body and weight. Wind can ruin a picnic so I figure every bit helps.
step 8. Clean up. Oilcloth is very easy to clean, simply whip clean with a damp cloth. EllynAnne has a great tip for easy clean up at a picnic, she suggests that we eat on and extra tablecloth so when you are done you can wrap it all up and take it home. This leaves the picnic mat ready for relaxation time.
step 9. Storage. Keep the creases away by folding it in half and then rolling it up. Your local fabric shop should happily give you their empty cardboard rolls.
Tuesday, December 16, 2014
No-Sew Oilcloth Tree Skirt
My silver Christmas tree sits in a corner that has a radiator and a fireplace hearth, so I went with a small 28" diameter tree skirt. It's just a few inches bigger than the tree stand and works well in the space allowed. Oilcloth is 47" wide, so you can make it much bigger than my sample.
Once I picked out the red lace oilcloth, I needed to find the center of the oilcloth. Notice how the print has a medallion motif in the center of the width of the oilcloth? This motif repeats every 16 inches, so when you are working with a print with a predominate repeat you need to buy a bit more fabric than you need, so you can adjust your pattern left and right so your circular tree skirt looks its best.
Once I found the center of what will be my oilcloth tree skirt, I folded it in half and did a little finger press to mark my center with a crease.
Next, I fold it into quarters so the wrong side is out; do so by folding it half width-wise and then length wise. Thankfully you can see a faint bit of the lace on the back side to help you fold properly and find dead center of the medallion.
To double check the placement you can place a pin in the corner as shown above. Open up the fold and check to see if your pin is in the center. If not, make any adjustments needed.
Refold and place some clothes pens along the folds to keep the fabric from sliding around. Use your ruler to measure out a quarter circle. Once you decide on the diameter of your tree skirt divide your that number by 2. My tree skirt is 28", so I drew an arc that is 14" from the corner, or pivot point. Using a ruler or table measure, make a series of dashes every inch or two from the top to the bottom of your arc, then connecting the dots into a smooth curve.
Do the same process for the smaller hole that is in the center of your tree skirt. This hole needs to be the same diameter as the hole in the base of your stand that holds the pole of your tree. My stand has a 1" diameter hole so I make a tiny 1/2" arch at the corner of my folded tree skirt fabric.
Oilcloth doesn't fray or ravel so you don't have to finish off the edges. I used pinking shears to cut out the outer circle and regular scissors to cut out the center hole.
Now unfold the tree skirt and cut a straight line from the outer edge to the hole. I did this with a rotary cutter and ruler on top of my cutting mat. I just followed the print of the fabric to do so. This slit allows me to get the tree skirt on and off with ease.
June Suggests: If you have the time to make this super fancy you could trim off the edges with 1/4" bias tape, but you don't have to.
Simply wrap the tree skirt around the base of your tree and allow it to cover the stand. The back of the skirt will overlap and create a little volcano like shape. See, easy peasy!
Helpful tip: Oilcloth tree skirts are great for pet owners; the non-stick, water-proof, easy-to-clean surface helps with many issues.
Wednesday, September 23, 2009
Holiday Tutorial Series -- Small Circular Tablecloth for Halloween

Tuesday, November 11, 2008
OCA sewing tip #3---PRESSING OILCLOTH

Oilcloth can not be pressed with an iron in most cases. You can use a very low temp iron on the back side but I really don't suggest it. Trust me, I have had my fair share of accidents.
So how do I get a nice finished look to my oilcloth products? Well, I finger press-- A LOT! I simply use my fingers to create folds and creases while I am sewing. I do this by running my fingers across the oilcloth several times while applying pressure. This heats up the oilcloth and makes it supple and easier to crease.
If I have a lot of layers and some extra time I will place my project under a pile of books.
Note: As in all sewing there is a big difference in pressing and ironing! When working with oilcloth pressing is good, ironing is bad.
Monday, March 30, 2009
oilcloth picnic mat tutorial
After reading the new book by EllynAnne Geisel, The Kitchen Linens Book: Using, Sharing, and Cherishing the Fabrics of Our Daily Lives, I just had to make this pretty picnic mat for my family. The day my family spent flying kites in a wet field I knew we needed one of these, but it was the section on picnics that made the idea a reality. My philosophy for both shops Modern June and Oilcloth Addict is that small things in life help to make big memories. I know EllynAnne feels the same way. Linens of all types evoke fond memories.
Check out my review of the book at Sew Mama Sew! Don't forget to leave a comment after reading the post, Sew Mama Sew is giving away 6 books!!!
Be aware my mat is a big one, 8' x 8', just great for a family of four. Feel free to scale up or down for your needs.
Stuff you gotta have:
4 yards of oilcloth, seen in Lime Green Gingham
A fat quarter of a fun fruity oilcloth pattern, appliques are from the Apples and Pears Oilcloth
Rotary cutter
Ruler or yard stick
Gypsy Gripper, an optional tool I can not live with out.
Thread

step 1. Cut cut out your appliques and take your four yards of oilcloth and cut it into two equal parts ( two, two yard pieces)
step 2. Pin your appliques in the correct corners. You are doing this first so don't have to wrangle that big mat under the machine like it did! Trust me do it now while it is in pieces!
step 3. Sew your appliques into place.
Tip! When turning sharp corners leave your needle in the down, lift pressure foot and then turn.
step 4. Sew your two sides together making a large 8 foot square. Sew right sides together using a 1/2 SA. I suggest you place your machine on the largest table you have, this is a lot of oilcloth, a large table will help support the bulk and keep you happy.
step 5. Lay oilcloth face up roll both sides of the up so you can easily get to your seam. Now finger press your seam off to the left. There is no need to pin.
step 6. Back at the machine you are going to want to do an edge stitch off to the left. This is going to strengthen your seam and substitute not being able to iron. This will help that seam behave. As you stitch make sure both sides of the seam are off to the left.
Tip! I like to use the inside edge of the presser foot as a guide to keep my top stitch straight.
step 7. Fold you hem up one inch and sew one side, then do a faux mitered corner. Or better yet check out this tut for the real thing. I wish I had looked that up when I was sewing up the hem.
Note! Oilcloth does not fray so you could leave this edge raw or pink the edges. I hemmed the mat to help give it body and weight. Wind can ruin a picnic so I figure every bit helps.
step 8. Clean up. Oilcloth is very easy to clean, simply whip clean with a damp cloth. EllynAnne has a great tip for easy clean up at a picnic, she suggests that we eat on and extra tablecloth so when you are done you can wrap it all up and take it home. This leaves the picnic mat ready for relaxation time.
step 9. Storage. Keep the creases away by folding it in half and then rolling it up. Your local fabric shop should happily give you their empty cardboard rolls.