Showing posts sorted by relevance for query great idea. Sort by date Show all posts

Wednesday, July 6, 2011

Your Great Idea Round UP


Here's a round up of all you great ideas over the last few years.  


Wednesday, January 13, 2010

Great Idea---Chalk Cloth Table Tops


photo credit John Gruen

Raina Katterlson's incredible home was recently featured on Design*Sponge--design Nirvana! While studying her interiors for inspiration, I noticed that she too had the great idea of covering her table top with Chalk Cloth!  Want to get the look?  Check out my how I created our Thanksgiving table topper out of Chalk Cloth!!!  

Thursday, February 11, 2010

Great Idea... Laminated Cotton Cell Phone Cozie


Linda from Mommy Treasures was one of our 2009 oilcloth winners, she won a half a yard of the new Amy Butler laminated cotton. Today, she sharing with us her cute little iphone cover, I love how she used the bonus scraps I sent her. Really, what's not to love?

If you have a Great Idea you would like to share please contact me at Kelly@modernjune.com with your links and photos!

Come back tomorrow for my birthday party!!! I will be giving away a few presents!  

Monday, December 5, 2011

Great Idea: Chalk Cloth Tags Times Two

Photo credit: My Very Educated Mother
You know I am huge fan of the chalk cloth tag all you need is a fat quarter of chalk cloth and your golden.  I've made a few in my time and we've got a few tutorials here on our blog, ovals and ornaments!! And, there's a fun one in my book, Sewing with Oilcloth! Today I found two more to add in to the crafty mix! My Very Educated Mother shares not one but two versions to get busy with.


Photo credit: My Very Educated Mother
I like this one a lot, it's a fun no-sew project. We love those, don't we? MVEM uses Mod Podge to glue the felt to the back of the chalk cloth. Keep in mind, this won't work when attempting to glue chalk cloth to oilcloth or to another layer of chalk cloth. I've never met a glue that would adhere the two together. The felt works because it will allow the glue to dry. Cleaver!!! I am so getting out some Mod Podge and some scraps of cotton and felt tomorrow and trying this out!!!!

Got a Great Idea? Please share it with us, just contact me at Kelly@modernjune.com any old time. 

Thursday, May 26, 2011

Great Idea: Lined Bushel Basket

Photo Credit: Lorajean's Magazine

I love, love, love this idea that was recently featured on Craft Gossip. Lorajean's Picnic Basket Tutorial reminded me of something similar that was in the Home Girl booth at the Ohio Country Living Fair. (see last photo) I love a bushel basket all by it's fun little self but add a liner and I could die! Don't you think that laminated cotton would be a perfect fabric for this project?

Illustration Credit: Lorajean's Magazine

Laminated cotton is softer and more supple than the oilcloth so it can handle the gathers in Lorajean's wonderful tutorial with ease! (Pun intended!) Plus it's waterproof so it's easy clean up, just wipe clean and hang out to dry.

Home Girls, Country Living Fair 2010
The intended use for the original project was for a picnic basket, which is just as cute as it could possibly be, but I could see this being a great project basket. You could store all the bits and pieces for a single project in basket, the handy pockets would keep everything in it's place. I am thinking this would be a great way to store the two crazy crocheted afghans I've been working on. Unfortunately,  I've been working on them for about a 100 years and they're both still small enough to fit in a bushel basket.

Happy sewing!

Tuesday, June 7, 2011

Great Idea: Beach Comber Bag


Here's another great tutorial that would be great made out of laminated cotton. Christina from Two Little Hooligans, made a fun little beach comber bags that are great for corralling all of your pool and beach bottles. I'll be making a couple of these for our family vacay in September!

Cristina's tutorial uses 2-3 fat quarters, so I thought it was a great time to make a listing for laminated cotton fat quarters, because sometimes you only need a little bit to get the job done!

Tuesday, November 11, 2008

OCA tutorial #2 "Keep on Rollin"


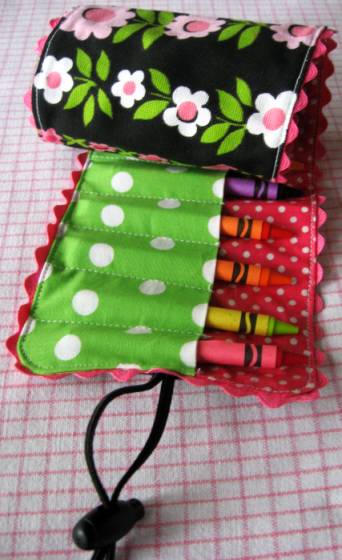
It's Tuesday so that means that it is tutorial time here at OILCLOTH ADDICT! Todays guest tutorial comes from Skip to my Lou! My friend and assistant Suzanne (of Silver Tree Art fame!) introduced me to this next blogger! This blog is choke full of free patterns, downloads and loads of inspiration! I could get lost there for days! Cindy is letting us share her Crayon Roll Holder, and we can't thank her enough!

Suzanne brought this idea to me because she believes this would be a great project to do with Oilcloth, I could not agree more! Oilcloth is great for all kinds of kids products. It whips clean with a damp sponge and comes in tons of great colors and patterns. I for one am seeing some lovely hand made gifts for my nieces and nephews! I know the parents will love them too!
There is two ways you can change the tutorial below you could simply replace the larger inner piece that Cindy has used the iron on vynal or you could use oilcloth for the entire projects.

Here is our modified supply list for the Crayon Roll:


One to three OCA Fat Quarters
1 - 5 X 16 1/2 inch piece of fabric for the outside (oilcloth optional)

1 - 5 X 16 1/2 inch piece of fabric the the inside
(OILCLOTH)
1 - 6 X 16 1/2 inch piece of fabric folded lenghtwise and pressed for the pocket
(oilcloth optional)
ric rac (never optional in my world!)
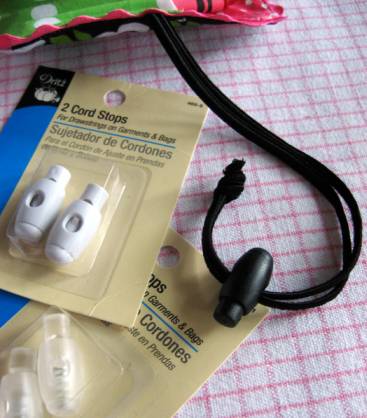
cord and cord stop

Now on with the tutorial...NOTES FOR OILCLOTH ARE IN RED!

This Crayon Roll Holder is a great and useful gift for children!
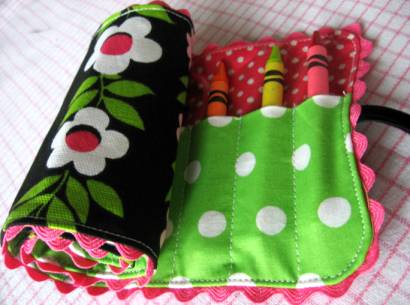
I noticed on our crayon roll that the inner fabric lining gets marked up quite a bit from the crayons going in and out. So this time instead of using interfacing on the lining piece I covered it with iron on vinyl. This is such a cool product. I had to keep myself from covering all the pieces—and I am glad I didn’t. The turning at the end gets it a bit wrinkled. I fear if I had done the whole thing it might look like a mess. The only draw back is that it is slicker and the crayons have less friction. However the new closure allows you to tighten it up to keep the crayons inside.

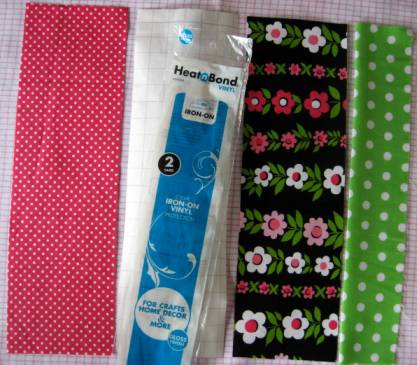
You need:

1 - 5 X 16 1/2 inch piece of fabric for the outside
1 - 5 X 16 1/2 inch piece of fabric the the inside
1 - 6 X 16 1/2 inch piece of fabric folded lenghtwise and pressed for the pocket
ric rac (if desired)
1 - 5 X 16 1/2 piece of iron on vinyl
1 Cord Stop
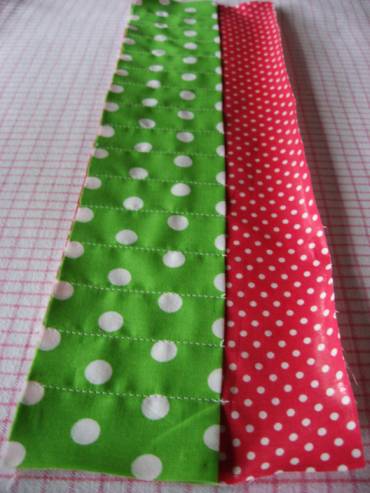
Iron on the vinyl to the right side of your lining piece following package directions.

Place pocket piece ontop of right side of lining. Starting 1 1/4 inches over from the edge, stitch from top of pocket (back stitch at top) to bottom. Then stitch every 1 inch. You should have 1 1/4 inches left on the other end. USE LONG STITCH LENGTH when stitching directly on top of oilcloth.
If using ric rac pin it around the edges, overlap at bottom. I use fray check to keep ends from unraveling.
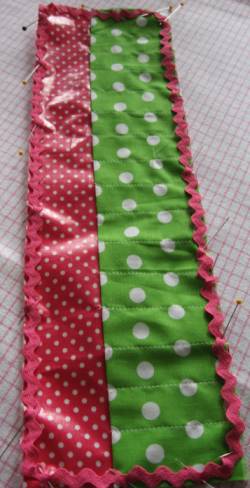
Place outside piece ontop of pocket and lining, right sides together. Place a 20″ piece of cord (folded in half) in the middle on the right side. Ends of cord go towards the center.
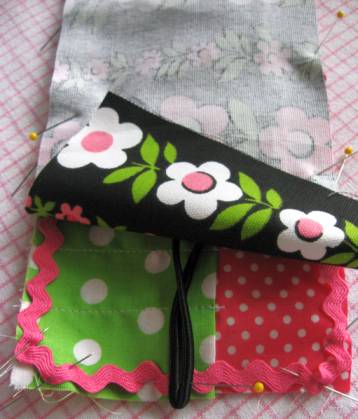
Sew all the way around 1/4 inch from the edge. Leave a 2-3 inch opening at the TOP. OILCLOTH CAN BE TOUGH TO TURN SO LEAVE 4-5 INCHES FOR THE OPENING.
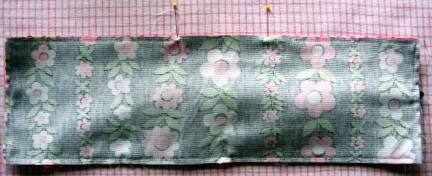
Clip corners and turn. Press (If you do use oilcloth DO NOT press OILCLOTH with bare hot iron), making sure to press opening to the inside. FINGER PRESS OILCLOTH EDGES SMOOTH. Pin opening shut and then top stitch all the way around very close to the edge (making sure you sew all layers of the opening shut.)
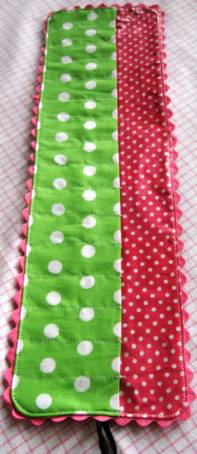
Squeeze the Cord Stop and thread both ends of the cording through the center hole (have patience, thread ends one at a time). Tie the ends of the cording together into a knot. I placed a drop of glue in the knot to keep it secure and then put fray check on the ends.
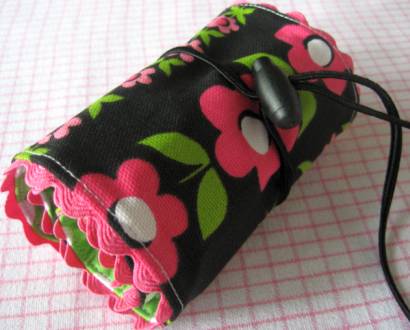
Finished! OCA recommends you place your finished product laying open on a flat surface and stack a few heavy books on top of it to get the seams nice and flat.


This tutorial was originally published at Skip to my Lou on September 9, 2008. Oilcloth Addict has posted it with their express permission. As always OCA is dedicated to offering you great tips and projects. If you have an idea that would fit with in out blog please let us know. We would love to share your ideas too!

Go get crafty!

Friday, June 5, 2009

Great Idea, Oilcloth at the Yard Sale


Photo Credit: Today Show

Yesterday the Today Show featured one of the my favorite junk loving designers, Sue Whitney! Sue is one of the talented ladies behind Junk Market Style! I have long been a fan, eating up the books and magazine features. Much of my decor deserves their credit!

Sue was on the show giving us loads of great tips for selling our extra junk at yard sales! But what got the attention of one of our wonderful customers was the oilcloth that she used through out the yard sale set. There was lot of bright and fun oilcloth used on the tables and signs! For the tables she used brightly colored oilcloth yardage to draw in customers. I love what she did for the signage, she pulled out the flower patten from the oilcloth and got crafty! By doing so one is sure to intrigue any and all lookie loo's, I mean when someone goes that far to attract attention, you gotta think that they are going to have some fantastic loot for sale! It is all about the details, isn't it?

Check out the Today Show video on the Junk Market Style Website and then go and see the still photos on the Today Show Site!

And a big thanks goes out to you all that are keeping me informed about all the great oilcloth press and projects that are out there. Joe, you were so kind to let me know about this! To every reader, thanks for hanging out and most of all thanks for your constant support.

Sunday, July 3, 2011

Great Idea: Make Up Brush Roll

Photo Credit: Laura Nownes
Laura Nownes from See How We Sew, shared her the project she whipped up for her daughter. This great laminated cotton make up brush roll took her all of 20 minutes. Get the 411 here. While your there be sure to read the great story about being an on-call project mom. I am so there!!!

By the way, we're getting that dandy stripe in pink next week!!!

Wednesday, November 5, 2008

OCA Tutorial #1 "Not your Mama's Rubber Gloves"

Well I am so proud to announce our very first guest tutorial! The brilliant ladies at Little Birdies Secrets have just posted this great tutorial earlier this week. Well I did not hesitate one second to contact them, asking them (ready to beg them) for permission to borrow their wonderful post. The three ladies that run this great blog are dedicated to offing us creative, dyi projects. Little Birdies I can't thank you enough for sharing!

I have always admired these great gloves, what's not to love... pretty hands, rick rack AND oilcloth! I have always wanted a pair for myself and yet again I am tempted to make them for Modern June! HMMMMM.....how cute, they could match our aprons!

But honestly right now I am thinking holidays!!! Specifically "Girl Friend Gifts"! How cool would that be? Fun and inexpensive. One yard of OCA oilcloth costs just under $7.00 and you can get 4 pairs of gloves out of it. I estimate that four presents would cost about $4.00 a piece!!! Now that is a great price for something totally kitsch and useful!

Now on with the tutorial...


This is one hilarious project. I love these dish gloves! For the lady that wants to stay fashionable at all times, even while cleaning. Think hostess gifts! Maybe pair them with a matching apron. . .

Not Your Mama's Rubber Gloves Tutorial

What you'll need:

Household rubber gloves (Walmart has white ones, Target has blue--check dollar stores, too)
Oil Cloth (¼ yd. cut is enough)
Ribbon or trim
Sewing machine
Hot glue gun

Okay, let's get started!

1. Put the gloves on and measure around the end (largest part of the glove that is on your arm). You want your finished, pleated oilcloth to be ½ an inch larger than this measurement. My gloves were 10 inches around so I wanted my pleated oilcloth to be 10 ½ inches long.

2. Cut your oilcloth. I cut my oil cloth to be 4 inches wide and approximately 37 inches long. Pleat the oilcloth by making small folds (about 1/4" to 1/2" long) and sewing over the fold across entire piece.


3. Take the short edges of the oil cloth, put them right sides together, and sew them using a ¼" seam. You should now have a ring of pleated oilcloth.


4. Slide the glove onto your sewing machine. Place the oilcloth wrong-side out on the machine over the glove, leaving a 1/2" of glove at the top, and stitch together.


5. This step is optional, but very cute. Use pinking shears to cut the unsewn, bottom edge of the oilcloth.


6. Hot glue coordinating ribbon around the glove, leaving two long tails on the top of the glove (if you want a bow). Tie the tails in a bow. Tip: It's easier to tie the bow if you can have someone else wear the gloves while you do it.

7. Go do those dishes like the hot mama that you are!


This tutorial was originally published at Little Birdies Secrets on November 3rd, 2008. Oilcloth Addict has posted it with their express permission. As always OCA is dedicated to offering you great tips and projects. If you have an idea that would fit with in out blog please let us know. We would love to share your ideas too!

Go get crafty!